使用jQuery插件-passwordStrength检查密码强度
现在很多注册页面都能显示密码强度,告诉用户使用复杂度高的密码。
现在有很多实现类似功能的js。基本原理都是:使用js触发text表单输入元素的keyup事件,根据输入字符的长度以及类型数量(比如数字,小写字母,大写字母,特殊字符等)动态修改提示元素的样式和文本。
下面演示的passwordStrength插件是基于jQuery的。
该插件使用一幅包含10个状态的图片显示密码强度。根据密码的输入,动态设置图片的垂直偏移量,达到切换不同状态的效果。
下面将该插件应用到asp.net应用程序中:
1、解压压缩包后,将password_strength.css文件放置到主题文件夹下(如果网站通过主题设置页面样式的话),否则,将该文件放置在css文件夹下。
该文件的样式定义如下:
.is0{background:url(../images/progressImg1.png) no-repeat 0 0;width:138px;height:7px;}
.is10{background-position:0 -7px;}
.is20{background-position:0 -14px;}
.is30{background-position:0 -21px;}
.is40{background-position:0 -28px;}
.is50{background-position:0 -35px;}
.is60{background-position:0 -42px;}
.is70{background-position:0 -49px;}
.is80{background-position:0 -56px;}
.is90{background-position:0 -63px;}
.is100{background-position:0 -70px;}
2、如果使用了主题,则在主题文件夹下创建一个images文件夹,然后将progressImg1.png文件放置在文件夹下。此时应该修改上面的第一行样式类iso的图片地址为:url(images/progressImg1.png),其他不变。
3、然后新建一个页面,比如说注册页面。可以输入以下代码:
<td align="left">
<asp:TextBox runat ="server" ID="txtPwd" TextMode ="Password"></asp:TextBox>
<img src="" id="imgPwd" alt=""/><span id="spanPwd" class="alertTip"></span>
<div id="passwordStrengthDiv" class="is0"/>
<p class="regTooltip">(必填)密码长度要在6-18位之间,只能由字符(a-z)、数字(0-9)和下划线(_)组成</p>
</td>
注意上述代码的红色部分,id使用的是默认值,因为在js插件中,会默认查找该ID的元素(如下红色代码),并将状态图片显示在此。也可以修改,但要求js和页面要保持一致。
$.fn.passwordStrength.defaults = {
classes : Array('is10','is20','is30','is40','is50','is60','is70','is80','is90','is100'),
targetDiv : '#passwordStrengthDiv',
cache : {}
}
4、然后在页面中引入jQuery库和插件,并编写如下代码:
<head runat="server">
<title></title>
<script src="/js/jquery-1.7.2.min.js" type="text/javascript"></script>
<script src="js/jquery.passwordStrength.js" type="text/javascript"></script>
<script type="text/javascript">
$(function () {
$("input[id$=txtNewPwd]").passwordStrength();
});
</script>
</head>
注意密码框是服务器控件。
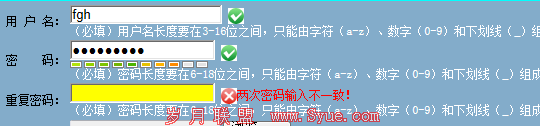
下图是演示效果:
扩展:上面的方法,页面初始加载时,图片默认显示。也可以修改让状态图片,在密码输入后才显示。
修改方法:
首先样式文件改成:
.is0{background:url(images/progressImg1.png) no-repeat 0 0;width:138px;height:7px;}
.is10{background:url(images/progressImg1.png) no-repeat 0 0;width:138px;height:7px;background-position:0 -7px;}
.is20{background:url(images/progressImg1.png) no-repeat 0 0;width:138px;height:7px;background-position:0 -14px;}
.is30{background:url(images/progressImg1.png) no-repeat 0 0;width:138px;height:7px;background-position:0 -21px;}
.is40{background:url(images/progressImg1.png) no-repeat 0 0;width:138px;height:7px;background-position:0 -28px;}
.is50{background:url(images/progressImg1.png) no-repeat 0 0;width:138px;height:7px;background-position:0 -35px;}
.is60{background:url(images/progressImg1.png) no-repeat 0 0;width:138px;height:7px;background-position:0 -42px;}
.is70{background:url(images/progressImg1.png) no-repeat 0 0;width:138px;height:7px;background-position:0 -49px;}
.is80{background:url(images/progressImg1.png) no-repeat 0 0;width:138px;height:7px;background-position:0 -56px;}
.is90{background:url(images/progressImg1.png) no-repeat 0 0;width:138px;height:7px;background-position:0 -63px;}
.is100{background:url(images/progressImg1.png) no-repeat 0 0;width:138px;height:7px;background-position:0 -70px;}
然后,将显示状态的div中的class去掉:
<div id="passwordStrengthDiv"></div>
其他代码保持不变。