JAX-WS Web 服务客户机入门
本教程所需要的软件
开始之前,需要在您的计算机上下载并安装以下软件:
NetBeans IDE 6.0 Web & Java EE。
Java Standard Development Kit(JDK)版本 5.0 或版本 6.0。
Glassfish V2 或 Tomcat Web Server,两者都可在 NetBeans IDE 6.0 安装程序中选择安装。
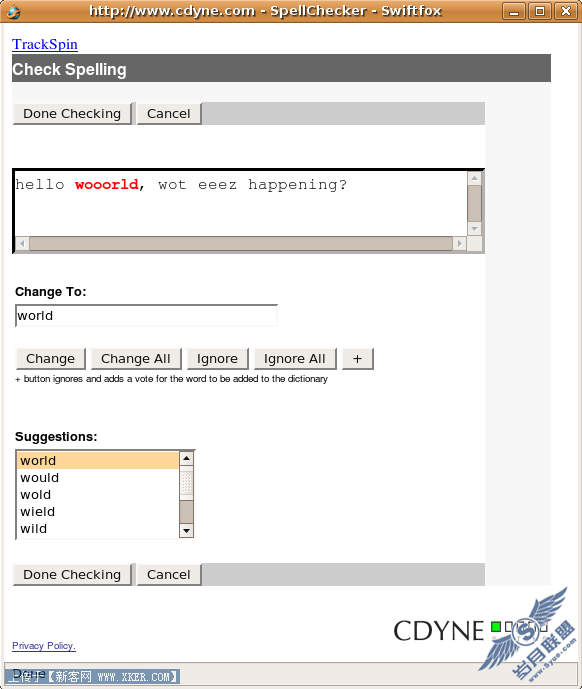
客户机界面如下所示,其中含有从 Web 服务接收的所有数据:
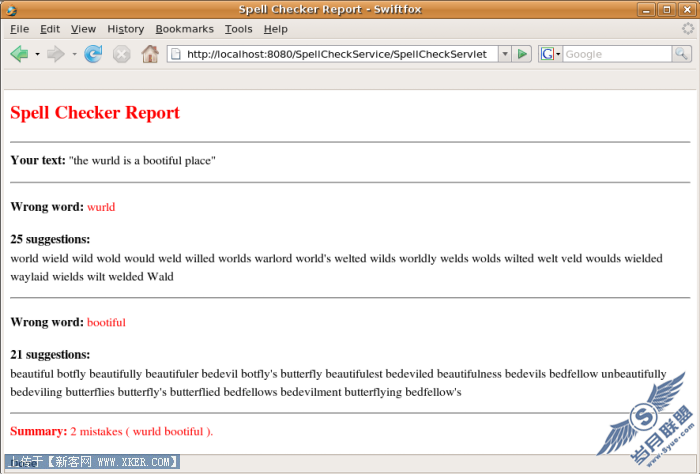
到本教程结束时,应用程序的功能将包括提供待检查文本、对 Web 服务调用操作和呈现结果。IDE 将生成联系 Web 服务及发送文本所需要的所有代码。拼写检查 Web 服务将处理其余内容,它将识别拼写错误的单词并提供一个替换词的建议列表。
注意: 本教程所使用的拼写检查 Web 服务由 CDYNE Corporation 提供。CDYNE 开发和销售一整套综合的数据增强、数据质量和数据分析 Web 服务及业务智能集成,并为之提供支持。拼写检查 Web 服务是 CDYNE 所提供的 Web 服务之一。注意,对于基于一个或多个 Web 服务的应用程序,其功能取决于这些 Web 服务的可靠性和可用性。但是,CDYNE 的 FAQ 指出,其产品的目标为“100% 可用性”,并且在“自然灾难、恐怖活动或其他灾难中,W eb 服务数据流将传递到我们的二级数据中心”。NetBeans 感谢 CDYNE 为本教程所做的贡献及对其发展的支持。
使用拼写检查 Web 服务
要使用 Web 服务,我们需要创建一个 Web 服务客户机。针对创建 Web 服务客户机,NetBeans IDE 6.0 提供了一个客户机创建工具:Web Service Client 向导可以生成查找 Web 服务的代码。它还提供了一些工具用于开发已创建的 Web 服务客户机——该工作区域由 Projects 窗口中的节点组成。这些工具是标准 NetBeans IDE 安装的一部分,它们都是直接可以开箱即用的,而不需要任何插件。
创建客户机
在本节中,我们将使用一个向导通过 Web 服务的 WSDL 文件生成 Java 对象。
选择 File > New Project(Ctrl-Shift-N)选项。在 Categories 列表中,选择 Web 选项。在 Projects 列表中,选择 Web Application 选项。单击 Next 按钮。将项目命名为 SpellCheckService,并确保指定了合适的服务器作为目标服务器。有关详细信息,请参见“入门”一节。单击 Finish 按钮。
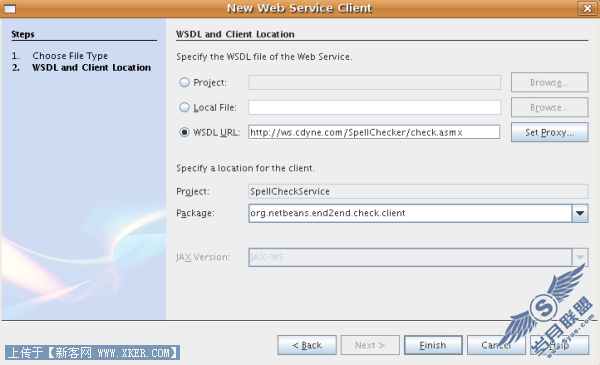
在 Projects 窗口中,右键单击 SpellCheckService 项目节点并选择 New > Other 选项。在 New File 向导中,选择 Web Services > Web Service Client 选项。在 Web Service Client 向导中,将以下 URL 指定给 Web 服务:
http://ws.cdyne.com/SpellChecker/check.asmx
如果位于防火墙后面,则需要指定一个代理服务器——否则无法下载 WSDL 文件。如果这样的话,单击 Web Service Client 向导中的 Proxy Settings 并设置代理主机和端口号。
输入 org.netbeans.end2end.check.client 作为包名。客户机对象将生成到指定的包名中。IDE 应如下所示:
单击 Finish 按钮。
在 Projects 窗口的 Web Service References 节点中,您应看到以下内容:
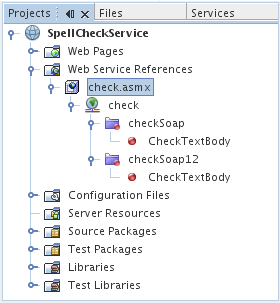
Projects 窗口中的内容表示,服务名为 check 的 Web 服务提供了一个 CheckTextBody 操作供应用程序使用。CheckTextBody 操作将检查字符串中的拼写错误,然 后返回数据供客户机处理。在整篇教程中,我们都将使用这个操作。
在 Files 窗口的 build 节点中,您应看到以下内容:
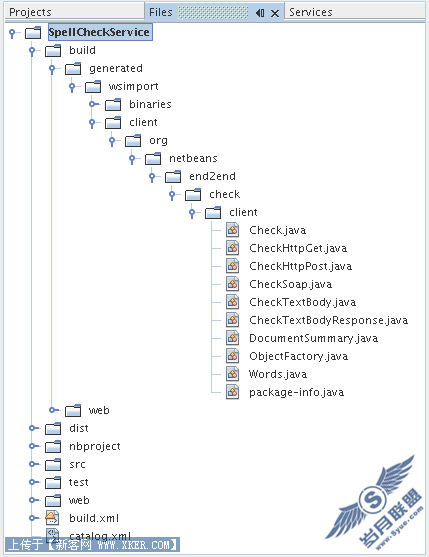
Files 窗口显示了由 JAX-WS Web Service Client 向导生成的客户桩。
开发客户机
有多种方式可以实现 Web 服务客户机。Web 服务的 WSDL 文件限制了能够发送给 Web 服务的信息的类型,并且还限制从 Web 服务接收的信息的类型。但是,WSDL 文件并未限制传递所需信息的 方式,也未限制用户接口的 内容。下面所构建的客户机实现由一个 JSP 页面(它允许用户输入待检查的文本)和一个 servlet(用于将文本传递给 Web 服务,然后生成包含结果的报告)构成。
编写 JSP 页面
我们的 JSP 页面仅包括一个文本区域(供用户输入文本)和一个按钮(用于将文本发送给 Web 服务)。
在 Projects 窗口中,展开 Web Pages 节点并双击 index.jsp 在 Source Editor 中打开它。
复制以下代码并将它粘贴到 index.jsp 代码中,覆盖原来的 <body> 标记:<body>
<form name="Test" method="post" action="SpellCheckServlet">
<p>Enter the text you want to check:</p>
<p>
<p><textarea rows="7" name="TextArea1" cols="40"
ID="Textarea1"></textarea></p>
<p><input type="submit" value="Spell Check"
name="spellcheckbutton"></p></form>
</body>
上述代码指定,当用户单击提交按钮时, textarea 中的内容将提交给 SpellCheckServlet servlet。
创建和编写拼写检查 servlet
在本节中,我们将创建一个 servlet 与 Web 服务进行交互。但是,我们将看到,执行交互的代码将由 IDE 提供。因此,我们只需处理业务逻辑,也就是准备用于检查的文本和处理结果。
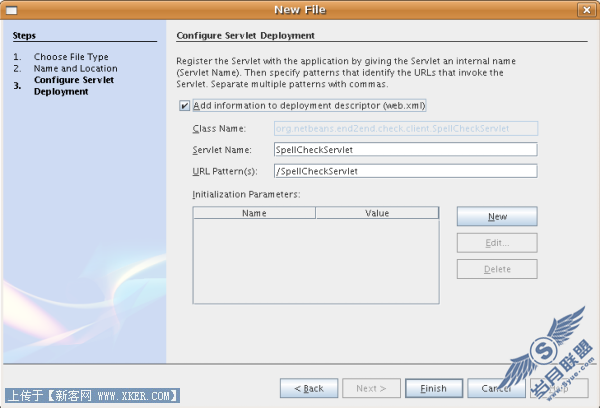
在 Projects 窗口中,右键单击项目节点并选择 New > Other,然后选择 Web > Servlet 选项。单击 Next 按钮。将 servlet 命名为 SpellCheckServlet,并在 Package 下拉列表中键入 org.netbeans.end2end.check.client。单击 Next 按钮。注意到,该 servlet 的 URL 映射为 /SpellCheckServlet,如下所示:
单击 Finish 按钮。servlet 将在 Source Editor 中打开。
将光标移动到 Source Editor 的 processRequest 方法中,在方法顶部的右侧添加一些新行。
在刚才创建的新行区域中单击鼠标右键,选择 Web Service Client Resources > Call Web Service Operation 选项。在 Select Operation to Invoke 对话框中,单击 CheckTextBody 操作,如下所示:
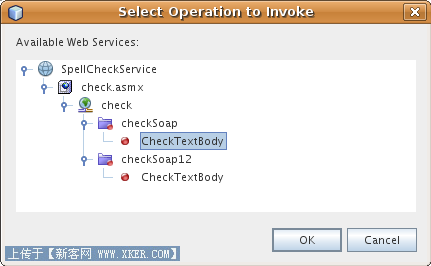
单击 OK 按钮。
注意: 我们还可以将操作节点从 Projects 窗口直接拖动到编辑器中,而无需使用上面的对话框。
在 processRequest 方法的顶部,我们可以看到一段调用 Web 服务的代码,如下所示:
try { // Call Web Service Operation
  org.netbeans.end2end.check.client.CheckSoap port = service.getCheckSoap();
  // TODO initialize WS operation arguments here
  java.lang.String bodyText = "";
  java.lang.String licenseKey = "";
  // TODO process result here
  org.netbeans.end2end.check.client.DocumentSummary result =
port.checkTextBody(bodyText,licenseKey);
  out.println("Result = "+result);
} catch (Exception ex) {
   // TODO handle custom exceptions here
}
我们只需该方法便可处理调用 Web 服务操作的事宜。此外,以下代码行将在类的顶部声明。
@WebServiceRef(wsdlLocation = "http://ws.cdyne.com/SpellChecker/check.asmx?WSDL")
private Check service;
将整个 processRequest 方法替换为以下代码(以下代码中的行内注释解释了各行的作用): )protected void processRequest(HttpServletRequest request, HttpServletResponse response) throws
ServletException, IOException {
response.setContentType("text/html;charset=UTF-8");
PrintWriter out = response.getWriter();
try {
// Call Web Service Operation
String TextArea1 = request.getParameter("TextArea1");
org.netbeans.end2end.check.client.CheckSoap port = service.getCheckSoap();
// TODO initialize WS operation arguments here
java.lang.String bodyText = TextArea1;
java.lang.String licenseKey = "0";
// TODO process result here
org.netbeans.end2end.check.client.DocumentSummary doc =
port.checkTextBody(bodyText,licenseKey);
String allcontent = doc.getBody();
//From the retrieved document summary,
//identify the number of wrongly spelled words:
int no_of_mistakes = doc.getMisspelledWordCount();
//From the retrieved document summary,
//identify the array of wrongly spelled words:
List allwrongwords = doc.getMisspelledWord();
out.println("<html>");
out.println("<head>");
//Display the report's name as a title in the browser's titlebar:
out.println("<title>Spell Checker Report</title>");
out.println("</head>");
out.println("<body>");
//Display the report's name as a header within the body of the report:
out.println("<h2><font color='red'>Spell Checker
Report</font></h2>");
//Display all the content (correct as well as incorrectly spelled) between quotation
marks:
out.println("<hr><b>Your text:</b> "" + allcontent + """ +
"<p>");
//For every array of wrong words (one array per wrong word),
//identify the wrong word, the number of suggestions, and
//the array of suggestions. Then display the wrong word and the number of suggestions
and
//then, for the array of suggestions belonging to the current wrong word, display
each
//suggestion:
for (int i = 0; i < allwrongwords.size(); i++) {
String onewrongword = ((Words) allwrongwords.get(i)).getWord();
int onewordsuggestioncount = ((Words) allwrongwords.get(i)).getSuggestionCount();
List allsuggestions = ((Words) allwrongwords.get(i)).getSuggestions();
out.println("<hr><p><b>Wrong word:</b><font
color='red'> " + onewrongword + "</font>");
out.println("<p><b>" + onewordsuggestioncount +
"suggestions:</b><br>");
for (int k = 0; k < allsuggestions.size(); k++) {
String onesuggestion = (String) allsuggestions.get(k);
out.println(onesuggestion);
}
}
//Display a line after each array of wrong words:
out.println("<hr>");
//Summarize by providing the number of errors and display them:
out.println("<font color='red'><b>Summary:</b> " + no_of_mistakes +
" mistakes (");
for (int i = 0; i < allwrongwords.size(); i++) {
String onewrongword = ((Words) allwrongwords.get(i)).getWord();
out.println(onewrongword);
}
out.println(").");
out.println("</font>");
out.println("</body>");
out.println("</html>");
out.close();
} catch (Exception ex) {
System.out.println("exception" + ex);
out.println("exception" + ex);
}
out.println("</body>");
out.println("</html>");
out.close();
}
注意,上述代码并未针对错误处理执行任何操作。有关详细信息,请参见 学以致用 一节。
部署客户机
IDE 将使用 Ant 构建脚本构建和运行应用程序。IDE 将构建我们在创建项目时输入的选项来构建脚本。我们可以在项目的 Project Properties 对话框中优化这些选项(右键单击 Projects 窗口中的项目节点,然后选择 Properties 选项)。
右键单击项目节点并选择 Run 选项。
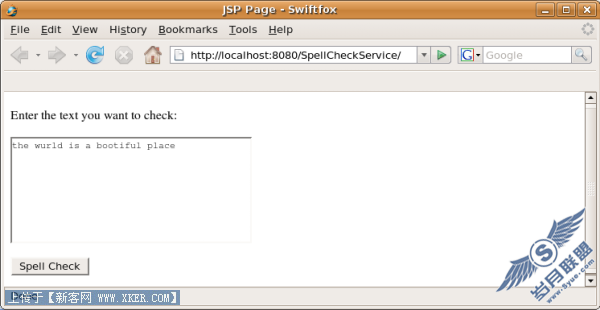
等待一段时间后,应用程序将部署和显示前面所编写的 JSP 页面。输入一些文本,确保其中一些单词包含拼写错误:
单击 Spell Check 按钮并查看结果:
学以致用
我们已经在 IDE 中完成了第一个 Web 服务客户机,接下来可以在应用程序中加入一些扩展功能。建议加入以下两个任务。
在 servlet 中添加错误处理代码。
重新编写客户机,使用户能够与从 Web 服务返回的数据进行交互。要获得更多灵感,请参见 CDYNE 站点上的客户机实现。如下所示: