centos6.0――lamp环境构建
1、确认搭建LAMP所需要的环境是否已经安装
[root@centos6 ~]# rpm -q make gcc gcc-c++ zlib-devel libaio
备注:安装libpng时候需要zlib-devel
安装mysql时候需要libaio
2、如果没安装则yum安装
[root@centos6 ~]# yum install make gcc gcc-c++ zlib-devel libaio -y
3、由于要使用编译安装,所以查看httpd、mysql、php是否安装,如果安装则卸载
[root@centos6 ~]# rpm -q httpd mysql php
4、编译安装libxml2
注:libxml2是一个xml的c语言版的解析器,不仅支持c语言,还支持c++、php、Pascal、Ruby、Tcl等语言的绑定
[root@centos6 LAMP]# pwd
/tmp/LAMP
[root@centos6 LAMP]# tar -zxvf libxml2-2.7.8.tar.gz
[root@centos6 LAMP]# cd ./libxml2-2.7.8
[root@centos6 libxml2-2.7.8]# ./configure --prefix=/usr/local/libxml2/
[root@centos6 libxml2-2.7.8]# make;make install
5、编译安装libmcrypt
注:libmcrypt是加密算法扩展库。支持DES, 3DES, RIJNDAEL, Twofish, IDEA, GOST, CAST-256, ARCFOUR, SERPENT, SAFER+等算法。
[root@centos6 LAMP]# pwd
/tmp/LAMP
[root@centos6 LAMP]# tar -zxvf libmcrypt-2.5.8.tar.gz
[root@centos6 LAMP]# cd ./libmcrypt-2.5.8
[root@centos6 libmcrypt-2.5.8]# ./configure --prefix=/usr/local/libmcrypt/
[root@centos6 libmcrypt-2.5.8]# make;make install
6、编译安装zlib
注:zlib是提供数据压缩用的函式库
[root@centos6 LAMP]# pwd
/tmp/LAMP
[root@centos6 LAMP]# tar -zxvf zlib-1.2.5.tar.gz
[root@centos6 LAMP]# cd ./zlib-1.2.5
[root@centos6 zlib-1.2.5]# ./configure --prefix=/usr/local/zlib/
[root@centos6 zlib-1.2.5]# make ; make install
7、编译安装libpng
[root@centos6 LAMP]# pwd
/tmp/LAMP
[root@centos6 LAMP]# tar -zxvf libpng-1.5.4.tar.gz
[root@centos6 LAMP]# cd ./libpng-1.5.4
[root@centos6 libpng-1.5.4]#
./configure --prefix=/usr/local/libpng/ --enable-shared
[root@centos6 libpng-1.5.4]# make ; make install
8、编译安装jpeg
[root@centos6 LAMP]# pwd
/tmp/LAMP
[root@centos6 LAMP]# tar -zxvf jpegsrc.v8c.tar.gz
[root@centos6 LAMP]# cd ./jpeg-8c/
[root@centos6 jpeg-8c]# mkdir /usr/local/jpeg/(创建jpeg软件的安装目录)
[root@centos6 jpeg-8c]# mkdir /usr/local/jpeg/bin/(创建存放命令的目录)
[root@centos6 jpeg-8c]# mkdir /usr/local/jpeg/lib/(创建jpeg库文件所在目录)
[root@centos6 jpeg-8c]# mkdir /usr/local/jpeg/include/(创建存放头文件目录)
[root@centos6 jpeg-8c]# mkdir -p /usr/local/jpeg/man/man1(建立存放手册的目录)
[root@centos6 jpeg-8c]#
./configure --prefix=/usr/local/jpeg/ --enable-shared --enable-static(建立共享库使用的GNU的libtool和静态库使用的GNU的libtool)
[root@centos6 jpeg-8c]# make ; make install
9、编译安装freetype
[root@centos6 LAMP]# pwd
/tmp/LAMP
[root@centos6 LAMP]# tar -zxvf freetype-2.4.6.tar.gz
[root@centos6 LAMP]# cd ./freetype-2.4.6
[root@centos6 freetype-2.4.6]#
./configure --prefix=/usr/local/freetype/ --enable-shared
[root@centos6 freetype-2.4.6]# make ;make install
10、 编译安装autoconf
[root@centos6 LAMP]# pwd
/tmp/LAMP
[root@centos6 LAMP]# tar -zxvf autoconf-2.68.tar.gz
[root@centos6 LAMP]# cd ./autoconf-2.68
[root@centos6 autoconf-2.68]# ./configure
[root@centos6 autoconf-2.68]# make ; make install
11、 编译安装GD
[root@centos6 LAMP]# pwd
/tmp/LAMP
[root@centos6 LAMP]# tar -zxvf gd-2.0.35.tar.gz
[root@centos6 LAMP]# cd ./gd-2.0.35
[root@centos6 gd-2.0.35]#
./configure --prefix=/usr/local/gd/ --with-zlib=/usr/local/zlib/ --with-jpeg=/usr/local/jpeg/ --with-png=/usr/local/libpng/ --with-freetype=/usr/local/freetype/
[root@centos6 gd-2.0.35]# make ; make install
12、 安装apache
[root@centos6 LAMP]# pwd
/tmp/LAMP
[root@centos6 LAMP]# tar -zxvf httpd-2.2.19.tar.gz
[root@centos6 LAMP]# cd ./httpd-2.2.19
[root@centos6 httpd-2.2.19]#
./configure --prefix=/usr/local/apache/ --enable-so --enable-rewrite
[root@centos6 httpd-2.2.19]# make ; make install
[root@centos6 LAMP]# /usr/local/apache/bin/apachectl start
[root@centos6 LAMP]#
cp /usr/local/apache/bin/apachectl /etc/init.d/httpd
[root@centos6 LAMP]# chmod +x /etc/init.d/httpd
[root@centos6 ~]# chkconfig --add httpd
注意:如果提示service httpd does not support chkconfig错误
解决办法:编辑/etc/rc.d/init.d/httpd在文件第二行加入
#chkconfig:2345 10 90
#description:Activates/Deactivates Apache Web Server
[root@centos6 ~]# chkconfig --level 2345 httpd on
[root@centos6 LAMP]# service httpd restart
开机自动启动apache的另一种方法:
修改/etc/rc.local文件
# vim /etc/rc.local
在文件中添加/usr/local/apache/bin/apachectl start
13、 编译安装mysql
[root@centos6 LAMP]# pwd
/tmp/LAMP
[root@centos6 LAMP]# tar -zxvf mysql-5.5.15-linux2.6-x86_64.tar.gz
[root@centos6 LAMP]# cd ./mysql-5.5.15-linux2.6-x86_64
[root@centos6 mysql-5.5.15-linux2.6-x86_64]# groupadd mysql
[root@centos6 mysql-5.5.15-linux2.6-x86_64]# useradd -r -g mysql mysql(创建mysql用户,并将用户指定至mysql组)
[root@centos6 mysql-5.5.15-linux2.6-x86_64]# cd /usr/local/
[root@centos6 local]# ln -s /tmp/LAMP/mysql-5.5.15-linux2.6-x86_64 mysql
[root@centos6 local]# cd ./mysql/
[root@centos6 mysql]# chown -R mysql .(将该目录的用户权限全部更改为mysql用户)
[root@centos6 mysql]# chgrp -R mysql .(将该目录的用户组全部改为mysql用户组)
[root@centos6 mysql]# ./scripts/mysql_install_db --user=mysql(将mysql目录的数据库使用权限指定为mysql)
[root@centos6 mysql]# chown -R root .
[root@centos6 mysql]# chown -R mysql data
[root@centos6 mysql]# cp support-files/my-medium.cnf /etc/my.cnf(将当前目录下的配置文件拷贝到系统配置文件下,并更名为my.cnf)
[root@centos6 mysql]# cp support-files/mysql.server /etc/init.d/mysqld
[root@centos6 mysql]# chmod +x /etc/init.d/mysqld
[root@centos6 mysql]# chkconfig --add mysqld
[root@centos6 mysql]# chkconfig --level 345 mysqld on
[root@centos6 mysql]# service mysqld restart
[root@centos6 mysql]#
/usr/local/mysql/bin/mysqladmin -u root password '123456'(设置root用户登录mysql的密码)
[root@centos6 mysql]# /usr/local/mysql/bin/mysql -u root –p(进入并访问mysql数据)
Enter password:
Welcome to the MySQL monitor. Commands end with ; or /g.
Your MySQL connection id is 2
Server version: 5.5.15-log MySQL Community Server (GPL)
Copyright (c) 2000, 2010, Oracle and/or its affiliates. All rights reserved.
Oracle is a registered trademark of Oracle Corporation and/or its
affiliates. Other names may be trademarks of their respective
owners.
Type 'help;' or '/h' for help. Type '/c' to clear the current input statement.
mysql>(成功登录mysql)
14、 编译安装php
[root@centos6 LAMP]# pwd
/tmp/LAMP
[root@centos6 LAMP]# tar -zxvf php-5.3.7.tar.gz
[root@centos6 LAMP]# cd ./php-5.3.7
[root@centos6 php-5.3.7]#
./configure --prefix=/usr/local/php/ --with-apxs2=/usr/local/apache/bin/apxs --with-libxml-dir=/usr/local/libxml2/ --with-jpeg-dir=/usr/local/jpeg/ --with-freetype-dir=/usr/local/freetype/--with-gd-dir=/usr/local/gd/--with-zlib-dir=/usr/local/zlib/--with-mcrypt=/usr/local/libmcrypt/--with-mysil=/usr/local/mysql/bin/mysql_config --enable-soap --enable-mbstring=all --enable-sockets
[root@centos6 php-5.3.7]# make ; make install
[root@centos6 php-5.3.7]#
cp php.ini-development /usr/local/php/lib/php.ini
#vim /usr/local/php/lib/php.ini
//这里需要将register_globals=Off更改on模式,还有时间格式改为本地
15、 更改apache的配置文件,达到解析php文件的目的
[root@centos6 ~]# vim /usr/local/apache/conf/httpd.conf
AddType application/x-compress .Z
AddType application/x-gzip .gz .tgz
Addtype application/x-httpd-php .php .phtml
Addtype application/x-httpd-php-source .phps
添加上面绿色内容,表示apache服务中可以解析php格式文件
接下来要检查apache目录下生成的php动态连接库文件,在目录/usr/local/apache/modules,找到是否存在 libphp5.so文件
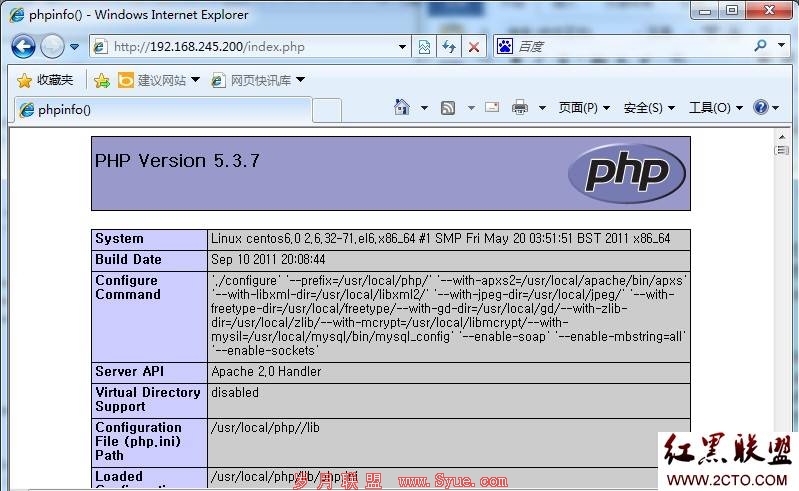
16、 验证
[root@centos6 ~]# vim /usr/local/apache/htdocs/index.php
添加内容为
<?php
echo phpinfo();
?>
在客服端验证,出现下图说明php搭建成功
作者“Darren-pan”

