Unix_Linux学习(1)――vim编辑器的使用学习
来源:岁月联盟
时间:2012-02-17
一:首先是安装gcc和Vim
安装gcc:
sudo apt-get build-depgcc或者sudo apt-get install build-essential
我的之前在配置某个环境的时候已经装好了。
Tminal中输入:gcc -v 显示gcc的版本信息,我是4.4.5
安装Vim
apt-get install vim-full
配置vimrc
先修改文件的权限
1、使用cd / 转到文件系统中;
2、cd/etc/vim 切换到vim目录内;
3、修改文件权限 : sudo chmod 777 vimrc ,会提示你输入密码,输入密码即可;
4、vim vimrc 打开vim文件,修改内容,我是直接粘网上的,修改前记得备份。
" All system-wide defaults are set in $VIMRUNTIME/debian.vim (usually just
" /usr/share/vim/vimcurrent/debian.vim) and sourced by the call to :runtime
" you can find below. If you wish to change any of those settings, you should
" do it in this file (/etc/vim/vimrc), since debian.vim will be overwritten
" everytime an upgrade of the vim packages is performed. It is recommended to
" make changes after sourcing debian.vim since it alters the value of the
" 'compatible' option.
" This line should not be removed as it ensures that various options are
" properly set to work with the Vim-related packages available in Debian.
runtime! debian.vim
" Uncomment the next line to make Vim more Vi-compatible
" NOTE: debian.vim sets 'nocompatible'. Setting 'compatible' changes numerous
" options, so any other options should be set AFTER setting 'compatible'.
"set compatible
" Vim5 and later versions support syntax highlighting. Uncommenting the
" following enables syntax highlighting by default.
if has("syntax")
syntax on
endif
" If using a dark background within the editing area and syntax highlighting
" turn on this option as well
"set background=dark
" Uncomment the following to have Vim jump to the last position when
" reopening a file
"if has("autocmd")
" au BufReadPost * if line("'/"") > 1 && line("'/"") <= line("$") | exe "normal! g'/"" | endif
"endif
" Uncomment the following to have Vim load indentation rules and plugins
" according to the detected filetype.
"if has("autocmd")
" filetype plugin indent on
"endif
" The following are commented out as they cause vim to behave a lot
" differently from regular Vi. They are highly recommended though.
"set showcmd " Show (partial) command in status line.
"set showmatch " Show matching brackets.
"set ignorecase " Do case insensitive matching
"set smartcase " Do smart case matching
"set incsearch " Incremental search
"set autowrite " Automatically save before commands like :next and :make
"set hidden " Hide buffers when they are abandoned
"set mouse=a " Enable mouse usage (all modes)
set tabstop=4
set softtabstop=4
set shiftwidth=4
set autoindent
set cindent
set cinoptions={0,1s,t0,n-2,p2s,(03s,=.5s,>1s,=1s,:1s
set nu
if &term=="xterm"
set t_Co=8
set t_Sb=^[[4%dm
set t_Sf=^[[3%dm
endif
" Source a global configuration file if available
if filereadable("/etc/vim/vimrc.local")
source /etc/vim/vimrc.local
endif
""""""""""""""""""""""""""""""""""""""
" 语法着色与高亮设置
""""""""""""""""""""""""""""""""""""""
"开启语法高亮
syntax enable
syntax on
"配色
"colo ruki
"colors ruki
"由于目前没有找到ruki插件,暂时取消该功能,找到该插件后,再启用该功能
"设置高亮搜索
:set hlsearch
""""""""""""""""""""""""""""""""""""""
" 文件设置
""""""""""""""""""""""""""""""""""""""
set encoding=utf-8
set fileencoding=chinese
set fileencodings=ucs-bom,utf-8,chinese
set ambiwidth=double
"检测文件的类型
filetype on
"默认无备份
:set nobackup
:set nowritebackup
""""""""""""""""""""""""""""""""""""""
" 鼠标设置
""""""""""""""""""""""""""""""""""""""
"鼠标支持
if has('mouse')
:set mouse=a
endif
"使鼠标用起来象微软 Windows,似乎正好解决 连续多行缩进问题、退格问题
:behave mswin
""""""""""""""""""""""""""""""""""""""
" 编辑器设置
""""""""""""""""""""""""""""""""""""""
"显示行号
set number
"Tab 宽度
:set ts=4
"自动缩进
:set sw=4
"C/C++ 风格的自动缩进
:set cin
"设定 C/C++ 风格自动缩进的选项
:set cino=:0g0t0(sus
"打开普通文件类型的自动缩进
:set ai
"在编辑过程中,在右下角显示光标位置的状态行
:set ruler
"显示匹配括号
:set showmatch
"在insert模式下能用删除键进行删除
:set backspace=indent,eol,start
"代码折叠, 命令 za
:set foldmethod=syntax
:set foldlevel=100 "启动vim时不要自动折叠代码
"设置字体
":set guifont=courier/ 9
"当右键单击窗口的时候, 弹出快捷菜单
:set mousemodel=popup
"自动换行
if (has("gui_running")) "图形界面下的设置
"指定不折行。如果一行太长,超过屏幕宽度,则向右边延伸到屏幕外面
:set nowrap
"添加水平滚动条。如果你指定了不折行,那为窗口添加一个水平滚动条就非常有必要了
:set guioptions+=b
else "字符界面下的设置
set wrap
endif
""""""""""""""""""""""""""""""""""""""
" 快捷键设置
""""""""""""""""""""""""""""""""""""""
"<F1> 菜单栏与工具栏隐藏与显示动态切换
set guioptions-=m
set guioptions-=T
map <silent> <F1> :if &guioptions =~# 'T' <Bar>
/set guioptions-=T <Bar>
/set guioptions-=m <bar>
/else <Bar>
/set guioptions+=T <Bar>
/set guioptions+=m <Bar>
/endif<CR>
"<F2>code_complete.vim插件:函数自动完成
if !exists("g:completekey")
let g:completekey = "<F2>" "hotkey
endif
"<F3><F4>大小写转换
map <F3> gu
map <F4> gU
"当前目录生成tags语法文件,用于自动完成,函数提示:code_complete.vim OmniCppComplete.vim ...
"map <F5> :!ctags -R --c-kinds=+p --fields=+S . <CR>
map <F5> :!ctags -R --c-kinds=+p --c++-kinds=+p --fields=+iaS --extra=+q . <CR>
"函数和变量列表
map <F6> :TlistToggle<CR>
"文件浏览器
map <F7> :WMToggle<CR>
let g:winManagerWindowLayout = "FileExplorer"
"文件树状列表
map <F8> :NERDTree<CR>
"映射复制、粘贴、剪贴ctrl+c ctrl+v ctrl+x
:map <C-V> "+pa<Esc>
:map! <C-V> <Esc>"+pa
:map <C-C> "+y
:map <C-X> "+x
" 映射全选 ctrl+a
:map <C-A> ggVG
:map! <C-A> <Esc>ggVG
" 多行缩进
:map <Tab> >
:map <S-Tab> <
""""""""""""""""""""""""""""""""""""""
" 插件设置
""""""""""""""""""""""""""""""""""""""
"开启OmniCppComplete.vim
set nocp
filetype plugin on
"2Html插件,启用XHtml css
:let html_number_lines=1
:let html_use_css=1
:let use_xhtml=1
"fencview.vim 插件设置
let g:fencview_autodetect = 1 "打开文件时自动识别编码
let g:fencview_checklines = 10 "检查前后10行来判断编码
"autocomplpop.vim & supertab.vim 插件设置
let g:AutoComplPop_IgnoreCaseOption=1
set ignorecase
""""""""""""""""""""""""""""""""""""""
" 其他设置
""""""""""""""""""""""""""""""""""""""
"去掉讨厌的有关vi一致性模式,避免以前版本的一些bug和局限
:set nocompatible
5.保存退出
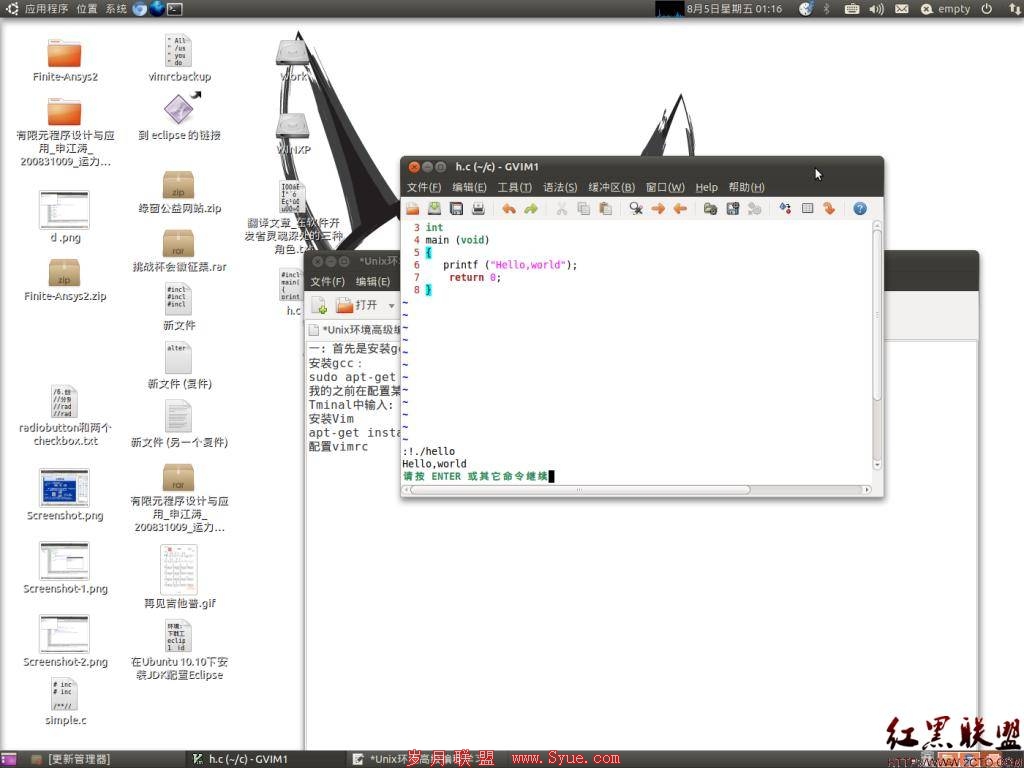
接下来是在Vim中编写一个Helloworld,然后用gcc编译运行。
在应用程序中找到GVim,
1.敲如以下代码:
#include <stdio.h>
int
main (void)
{
printf ("Hello,world");
return 0;
}
保存为h.c;
(注:Vim的基本操作可以在http://www.chinavim.org/学习)
2.在Vim中敲入:!gcc -Wall c/h.c -o hello
简单解释一下,:!在Vim中是调用外部命令的意思,-Wall是显示编译器的提示,之后就是源文件的位置,-o 之后接目标文件的文件名。
3.再运行./hello,结果如图(注:gcc编译之后最后生成的文件在命令的当前目录,而不是源文件的目录,-Wall最好加上);
4.打完收工。
以后就可以摆脱那些复杂的IDE了,还原编程本身。
作者 左脑设计右脑编程

