��win2003����cdo����CDONTS���ʼ�
��Դ����������
ʱ�䣺2005-09-20
CDONTS was actually replaced by CDO already in Windows 2000 and Windows XP. But these Operating Systems supported CDONTS, and you could use CDONTS. Windows Server 2003 does not support CDONTS, and we are forced to use CDO. This tutorial is a crash course in CDO, and we will create a few simple web forms for sending emails with CDO and ASP.
Before we begin
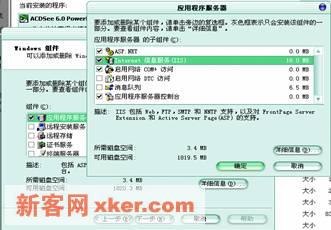
Before I show you any code, there are a few things we must do to get this to work. The first thing is set up a web server �C IIS 6.0. You can start the wizard for the installation of IIS 6.0 from Manage Your Server (Start->Programs->Administrative Tools->Manage Your Server).
Click Add or remove a role.
Select Application Server
You do not need ASP.NET nor FrontPage Server Extensions for this tutorial
But that is not enough; we also need the SMTP server to send our emails, though I will also show you how to use a remote server instead of the local. So, open up Add or Remove Programs from the Control Panel.
Click Add/Remove Windows Applications
Highlight Application Server, and click Details
Highlight Internet Information Services (IIS) and click Details
Select SMTP Service and click OK, and finally Next
We are almost ready for the code writing now, but since IIS 6.0 is locked down by default, we have to go to the Internet Information Services Manager (Start->Program->Administrative Tools) and enable the asp extension.
When the IIS Manager has started, click on Web Service Extensions in the left pane.
Select Active Server Pages, and click on Allow
That��s it! We are now ready for the fun part, the coding!
A simple text email
So, start your favorite text editor, and type this:
01|<%
02|If Request.Form("btnSend").Count > 0 Then
03|
04| Set objMessage = CreateObject("CDO.Message")
05| objMessage.Subject = Request.Form("subject")
06| objMessage.Sender = Request.Form("From")
07| objMessage.To = Request.Form("To")
08| objMessage.TextBody = Request.Form("message")
09| objMessage.Send
10| Response.Redirect("Sent.html")
11|End If
12|%>
13|
14|<html>
15| <head>
16| <title>Send email with CDO</title>
17| </head>
18| <body>
19| <form name="sendEmail" action="EmailWithCDO.asp" method="post">
20| <table>
21| <tr>
22| <td>Subject:</td>
23| <td><input type="text" name="subject" /></td>
24| </tr>
25| <tr>
26| <td>From:</td>
27| <td><input type="text" name="from" /></td>
28| </tr>
29| <tr>
30| <td>To: </td>
31| <td><input type="text" name="to" /></td>
32| </tr>
33| <tr>
34| <td valign="top">Message: </td>
35| <td><textarea name="message" rows="6" cols="30">
36|</textarea></td>
37| </tr>
38| <tr>
39| <td colspan="2"><input type="submit" name="btnSend"
40|value="Send" /></td>
41| </tr>
42| </table>
43| </form>
44| </body>
45|</html>
And now some explanation to this code. On line 2 we make sure that the form has been submitted. If it has, the count for the send button will be greater than 0. Line 4 creates a reference to the CDO component. Then, on line 5 to 8, we fill in subject, sender, receiver, and the text body. We do not fill out the From Property. The difference between From and Sender is that Sender identifies the user that actually submits the message, but From on the other hand, designates the author(s). Line 9 sends the email, and on line 10, we redirect the user to another page, with a message that the email has been sent. The rest of the code is pure HTML, and this tutorial assumes you have this knowledge.
So, browse the file, fill in the form, and click Send. Wait a while, and soon you will receive an email (you did change the email address to you own, didn��t you?).
This was a simple example of using CDO. And yes, it is this simple!
A simple HTML email
So, we now know how to send a text email. But what about a HTML email? Well, it is almost as simple as a text email. I will also introduce another new thing here, Blind Carbon Copy (Bcc), and Carbon Copy (Cc). So, what are we waiting for, let��s write some code!
01|<%
02|
03|If Request.Form("btnSend").Count > 0 Then
04|
05| Set objMessage = CreateObject("CDO.Message")
06| objMessage.Subject = Request.Form("subject")
07| objMessage.Sender = Request.Form("From")
08| objMessage.To = Request.Form("To")
09| objMessage.Bcc = Request.Form("Bcc")
10| objMessage.Cc = Request.Form("Cc")
11| objMessage.HTMLBody = Request.Form("message")
12| objMessage.Send
13| Response.Redirect("Sent.html")
14|End If
15|%>
16|
17|<html>
18| <head>
19| <title>Send email with CDO</title>
20| </head>
21| <body>
22| <form name="sendEmail" action="EmailWithCDO2.asp" method="post">
23| <table>
24| <tr>
25| <td>Subject:</td>
26| <td><input type="text" name="subject" /></td>
27| </tr>
28| <tr>
29| <td>From:</td>
30| <td><input type="text" name="from" /></td>
31| </tr>
32| <tr>
33| <td>To: </td>
34| <td><input type="text" name="to" /></td>
35| </tr>
36| <tr>
37| <td>Bcc: </td>
38| <td><input type="text" name="bcc" /></td>
39| </tr>
40| <tr>
41| <td>Cc: </td>
42| <td><input type="text" name="cc" /></td>
43| </tr>
44| <tr>
45| <td valign="top">Message: </td>
46| <td><textarea name="message" rows="6" cols="30">
47|</textarea></td>
48| </tr>
49| <tr>
50| <td colspan="2"><input type="submit" name="btnSend"
51|value="Send" /></td>
52| </tr>
53| </table>
54| </form>
55| </body>
56|</html>
So, what did we change here? Actually not much. On line 9 and 10 we have the two lines related to sending a Bcc and a Cc. And line 11 is changed to HTMLBody, so we can send a HTML email.
But, what if we want to send a webpage, or a saved HTML file? Well, it is very simple, just change HTMLBody to CreateMHTMLBody. So, the code would look like:
01|<%
02|
03|If Request.Form("btnSend").Count > 0 Then
04|
05| Set objMessage = CreateObject("CDO.Message")
06| objMessage.Subject = Request.Form("subject")
07| objMessage.Sender = Request.Form("From")
08| objMessage.To = Request.Form("To")
09| objMessage.CreateMHTMLBody Request.Form("message")
10| objMessage.Send
11| Response.Redirect("Sent.html")
12|End If
13|%>
14|
15|<html>
16| <head>
17| <title>Send email with CDO</title>
18| </head>
19| <body>
20| <form name="sendEmail" action="EmailWithCDO3.asp" method="post">
21| <table>
22| <tr>
23| <td>Subject:</td>
24| <td><input type="text" name="subject" /></td>
25| </tr>
26| <tr>
27| <td>From:</td>
28| <td><input type="text" name="from" /></td>
29| </tr>
30| <tr>
31| <td>To: </td>
32| <td><input type="text" name="to" /></td>
33| </tr>
34| <tr>
35| <td>Message: </td>
36| <td><input type="file" name="message"> </td>
37| </tr>
38| <tr>
39| <td colspan="2"><input type="submit" name="btnSend"
40|value="Send" /></td>
41| </tr>
42| </table>
43| </form>
44| </body>
45|</html>
The only new here is on line 9, where we are using the method CreateMHTMLBody to create the body of the email, which will now be a complete web site (or a complete file if that is what we chose to send).
Sending email using a remote server
Not always are we running a SMTP server on the same machine as the web server. But this is not a problem with CDO, and we can set it up so we are using a remote email server to send our emails. Let��s look at some code.
01|<%
02|
03|If Request.Form("btnSend").Count > 0 Then
04|
05| Set objMessage = CreateObject("CDO.Message")
06| objMessage.Subject = Request.Form("subject")
07| objMessage.Sender = Request.Form("From")
08| objMessage.To = Request.Form("To")
09| objMessage.TextBody = Request.Form("message")
10| objMessage.Configuration.Fields.Item _
11| ("http://schemas.microsoft.com/cdo/configuration/sendusing") = 2
12| objMessage.Configuration.Fields.Item _
13| ("http://schemas.microsoft.com/cdo/configuration/smtpserver") = "192.168.0.101"
14| objMessage.Configuration.Fields.Item _
15| ("http://schemas.microsoft.com/cdo/configuration/smtpserverport") = 25
16| objMessage.Configuration.Fields.Update
17| objMessage.Send
18| Response.Redirect("Sent.html")
19|End If
20|%>
21|
22|<html>
23| <head>
24| <title>Send email with CDO</title>
25| </head>
26| <body>
27| <form name="sendEmail" action="EmailWithCDO4.asp" method="post">
28| <table>
29| <tr>
30| <td>Subject:</td>
31| <td><input type="text" name="subject" /></td>
32| </tr>
33| <tr>
34| <td>From:</td>
35| <td><input type="text" name="from" /></td>
36| </tr>
37| <tr>
38| <td>To: </td>
39| <td><input type="text" name="to" /></td>
40| </tr>
41| <tr>
42| <td>Message: </td>
43| <td><input type="text" name="message"> </td>
44| </tr>
45| <tr>
46| <td colspan="2"><input type="submit" name="btnSend"
47|value="Send" /></td>
48| </tr>
49| </table>
50| </form>
51| </body>
52|</html>
On line 10 and 11, we tell it to use a remote server to send the email with (the value 2). The default value is 1, which means that it will use the local SMTP service. On line 12 to 14, we specify the name of the server we will use to send the email (or in this case, the IP number of the server). And finally, on line 15 and 16, we set the port to use, which is port 25, the default for SMTP.
But, what if we have to logon to the remote server? Well, it isn��t more difficult than sending logon credentials in our application. This code sample shows this (the HTML code is the same as the above).
01|<%
02|
03|If Request.Form("btnSend").Count > 0 Then
04|
05| Set objMessage = CreateObject("CDO.Message")
06| objMessage.Subject = Request.Form("subject")
07| objMessage.Sender = Request.Form("From")
08| objMessage.To = Request.Form("To")
09| objMessage.TextBody = Request.Form("message")
10| objMessage.Configuration.Fields.Item _
11| ("http://schemas.microsoft.com/cdo/configuration/sendusing") = 2
12| objMessage.Configuration.Fields.Item _
13| ("http://schemas.microsoft.com/cdo/configuration/smtpserver") = "192.168.0.101"
14| objMessage.Configuration.Fields.Item _
15| ("http://schemas.microsoft.com/cdo/configuration/smtpserverport") = 25
16| objMessage.Configuration.Fields.Item _
17| ("http://schemas.microsoft.com/cdo/configuration/smtpauthenticate") = 1
18| objMessage.Configuration.Fields.Item _
19| ("http://schemas.microsoft.com/cdo/configuration/sendusername") = "sendEmailAccount"
20| objMessage.Configuration.Fields.Item _
21| ("http://schemas.microsoft.com/cdo/configuration/sendpassword") = "mySecretPassword"
22| objMessage.Configuration.Fields.Item _
23| ("http://schemas.microsoft.com/cdo/configuration/smtpusessl") = False
24| objMessage.Configuration.Fields.Item _
25| ("http://schemas.microsoft.com/cdo/configuration/smtpconnectiontimeout") = 60
26|
27| objMessage.Configuration.Fields.Update
28| objMessage.Send
29| Response.Redirect("Sent.html")
30|End If
31|%>
It��s on line 17 the new stuff starts. First (line 17 and 18), we set the authentication method. In this example we use Basic Authentication (clear-text). If we want to use NTLM (Windows Authentication), we would change the number to 2 instead of 1. Then, on line 19 to 21 we specify which user account we will use. I have a special account for this application called ��sendEmailAccount��, which I used. We also have to pass the password to the SMTP server, and the password that will be sent is the one we set on line 22 to 24. On line 25 and 26 we set that we will not use SSL for the communication to the SMTP server. And then on line 27 to 29, we set the timeout to 60 seconds.
Conclusion
Using CDO is simple. Migrating from CDONTS to CDO should not be any problem, and as we have seen in this crash course, CDO is easy to learn. CDO is also very powerful, and can for example also be used to send news messages.
A complete reference can be found in MSDN:
http://msdn.microsoft.com/library/default.asp?url=/library/en-us/cdo/html/_olemsg_overview_of_cdo.asp
��һƪ��BackUp of SQL Server
��һƪ������Request